Saturday, November 9, 2013

wedding diy

Gah, just when I thought I'd be starting to blog consistently, I got super busy. Boo. Thought I'd share some wedding DIY crafts from my wedding in October. It was one of the most lovely days I've had. But goodness, it was a great deal of work. Rather thankful it is over. :)

Starting with the invitation:

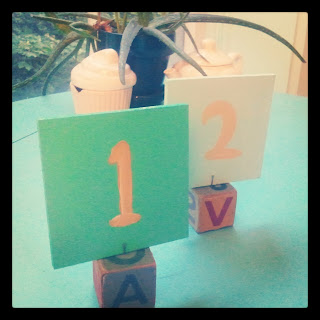
Table numbers: James and I bought old alphabet cubes from an antiques store, and then nailed two nails into each one. James did lovely job of painting numbers onto unfinished wooden squares. Cheery.

Pennants: my lovely friend Megan helped oh so immensely with making paper and cloth pennants for the tent. We bought scrapbook paper and then sewed them together with a sewing machine. So cute!

Cloth-ribbon pennant for zee wedding arch.

Cups for seating: We decided to give each of our guests a mug, which had their name and their table number on them. It was a super huge success! It really was not expensive either; we spent some months looking mugs at Goodwill, however.


Homemade chalkboards for signs: We bought several old frames at a flea market for a dollar and purchased some chalkboard paint for around fifteen dollars. James did a lovely job of painting them!

For the aisles, mother and I hung mason jars with hydrangeas from metal hooks. It was simple, but quite pretty.


Last shot: wedding day!


 more later! I must go bake brownies.

Saturday, August 24, 2013

BTV flashback: Church St. 1915


 For all the Burlington, VT fans: a newspaper overview of Church St. businesses, circa 1915. I wish some of these businesses were still around, but to my knowledge, not a single one exists any longer.


http://chroniclingamerica.loc.gov/lccn/sn86072143/1915-12-09/ed-1/seq-13/

Sunday, July 7, 2013

A return to the blogosphere, with old newspaper summer fashion in tow.

Goodness! It's been a terribly long time since my last blog post. Tsk, tsk. I have been quite busy, with both starting a new position, and, planning a wedding for October, if those are worthy excuses. I am determined to start posting more, however, particularly with cute wedding ideas and projects.

However, since I've recently starting working with old newspaper microfilms, it is only fitting I post some fashionable summer vintage styles from the early 1900's. I love, love that vintage is in!
If you want to see each image below more closely, click on the newspaper title. 


Bathing suits from 1916.  Quite different from today, women's swim attire consisted of often a hat, umbrella, skirt or dress, stockings, bloomers, flats, and a top with long or short sleeves. Swimming must have been such an ordeal! From the Burlington Free Press.

1914 Bathing "Costume." You can see the ruffled bloomers underneath the dress.
 From the Day Book


Just in time to block the sun, in a fashionable way, of course! Millinery (hat) styles from 1914. Love the "Helmet What?" and "Aeroplane." From the Day Book.


Straight out of Paris: Summer Evening Gowns from 1909. From the Los Angeles Herald.

Stripes are stylish now as they were 98 years ago. From the Day Book.


Such an adorable dress from 1915. I love her headband and fan; so sweet and summery! From the Day Book.


Lastly, some gorgeous wedding dress styles from 1922. The drop waist and draping on these outfits, combined with the headbands and long veils are just perfect. From the New York Tribune.

Happy summer! I'll post more later. 

Friday, March 29, 2013

Vintage magazine pages make lovely wall decorations!

When I go out antiquing, I usually end up at looking at old magazines or newspapers. I'll then usually end up buying the magazine (prices typically range from $1-20). Then, some of my favorite covers and ads end up on the wall. Here are some we have up in our current apartment. It's an affordable, unique way to decorate empty spaces in your living area!


Needlecraft Magazine. The cover from March 1928. I love the illustration--so sweet. I actually received several copies from a museum I worked in a few years ago. This adorable cover hangs above our craft supplies.


Even in the heat of the summer, Campbell's Vegetable Soup is a prudent choice! An ad from Women's Home Companion, July  1927. We have this hanging in our kitchen, of course.


So very persuasive. A close-up of the soup ad.


James and I found this magazine cover at an antiques store in Essex, Vermont. One of Norman Rockwell's iconic drawings for The Saturday Evening Post. This was his April Fool's Day cover for 1943. Only $5 for an original cover!


This isn't actually from a magazine, but it's still an advertisement sign from the late 1800's. This adorns a wall in our bathroom.


That's all for now! :) Thanks for reading/viewing. Happy Easter!
If you want to keep up with my posts, sign up as a follower on the right side of the blog.

Sunday, March 17, 2013

DIY: Literary Headboard

Happy St. Patrick's Day! 

I hope you all had a very green and cheerful day! 

Recently, I've been thinking about ways to repurpose and reuse old and damaged books. For most of my life, the very idea of taking apart a book or throwing a damaged book out was considered a sin. However, after spending the last two years working at a library, I realize that sometimes you really do have to recycle or throw out books. And that is where repurposing comes in. A book that started me off on this notion is The Repurposed Library by Lisa Ochipinti. She has some really wonderful ideas about making mobiles, bookshelves, mirrors, etc., out of old books. 

Inspired, I thought about the stack of old books lying around our apartment and how to rejuvenate them. We  also were in sore need of a headboard for our bed...and...an idea came! Let's make a headboard out of one of my very favorite books...a very damaged, 1960 ex-library edition of A Connecticut Yankee in King Arthur's Court by Mark Twain! 

**Important** Make sure if you decide to do a similar repurposing with old books gathering dust in your home that you aren't taking apart a rare or valuable book. A great place to look to get a quick book appraisal is www.addall.com. You can also look on the back page of the title page to see what edition the book is (if you see a first or even a second edition, you probably shouldn't use it--unless it's in terrible condition). For instance, I have a copy of You're in Love, Charlie Brown and I almost used it, except, I looked inside and realized it was a first edition. 

Anyway, this DIY project cost me a mere $8 and it took James, my boyfriend, and I two hours (including drying) to make it. It came out really quite classy...and nerdy, of course. 


First things first. 

Supplies: Mod Podge (a glue & gloss), Duct tape, box cutter, a paint brush or sponge, several thick poster boards or foamcore boards (number depends on the width of your bed), old book or magazine pages, scissors, and mounting tape (we used Scotch Permanent Mounting Tape). 

Foam boards laid out with Mod Podge & my beloved Arthurian work. 

Steps: 

1. Before going out to buy poster board, make sure you measure the width of your bed and decide how high you want your headboard to be. For us, we needed our board to be 57 inches long. We decided on a high of 22 inches, so we only needed two boards. 

2. Decide on a design! We went with a traditional look. An easy way to make both sides of your poster boards even is to do one side first (and cut it out with a box cutter) and then trace the outline of the first onto the second. 

3. Line up your poster board pieces and duct tape them together on one side. 

4. Flip your board around to the other side and start taking out pages of your book or magazine. Then you can figure out where you want them to go on your headboard. The book we selected has lovely vintage text, great passages, and beautiful illustrations that we decided to space out throughout the headboard. 


5. Next: time to Mod Podge! You will need to put Mod Podge on the poster board and then on top of the pages themselves. It comes out white at first, but it always dries clear and has a smooth, glossy finish. This part is the most time consuming. We did two coats of Mod Podge on ours and it came out great. 


6. After letting it dry completely (about 30-40 minutes or so after the second coat), trim any excess paper off your headboard. You could file or smooth edges as well. 

7. All done! Apply mounting tape to the back of your headboard (use a good amount, so it doesn't fall off in the middle of the night on you!), and hang it up on your wall for a literary tribute over your bed! :) 


James took a close up! 

Such a cozy space now! 

Let me know if you try this out or adapt it for another wall decoration. Or, if you have other ideas for repurposing books, please share in a comment below! [As I've been getting comments on how to comment, to comment: click on the No Comment button below.] 

Thanks for reading!! Have a delightful week. 
Karyn

Saturday, March 9, 2013

A trip to NYC is incomplete without rare books & manuscripts!

Hello all!

I had the great fortune to spend the latter part of last week in New York City. For those of us who primarily reside in cities of 42,000 or less, it is in the truest sense of the word, overwhelming. In a wonderful way, though. I didn't want to leave. 

Flatiron Building in Manhattan


As my counterpart, James, and I are wont to do, we spent the majority of our time in museums and libraries.  Below, some of my favorite pieces, most of which are from the Morgan Library & Musuem.

Gutenberg Bible (in meticulous condition!), Mainz, 1455. One of the THREE that the Morgan Library had in its collection.


If only they made book covers like this now! Bejeweled silver and gold cover, ca. 760-90. Lovely condition. 

My absolute favorite (I am partial, because I used this work in my study of St. Edmund for my senior thesis!). The Life, Passions, and Miracles of St. Edmund, by Abbo of Fleury and Osbert of Clare, 1130.


A messy, but brilliant, composition by Beethoven at the Morgan Library & Museum.


Sumerian cuneiform. The earliest form of written language. 

Not a manuscript or book, but I loved this modern-art piece at the Museum of Modern Art.

Beautifully illuminated manuscript with some reliquaries (in which saints' remains would have been placed in the middle ages) and goblets in the background at the Metropolitan Museum.

 Bibliophile that I am, I will end this post with a shot of the interior of Pierpont Morgan's private library. 


Sunday, February 24, 2013

Origami Cupcakes Recipe!

Last night when I was watching an excellent (and highly recommended) Korean drama (City Hunter), I decided to multi-task and design an origami cupcake. Ever since my friends and I became obsessed with cupcakes in our senior year of college, I've been an adamant supporter of the cupcake renaissance! I must share, therefore, a picture of the giant snow cupcake (award-winning!) I made with my roommates for snow-sculpture contest a few years ago:

But back to my origami cupcake recipe. They're definitely not perfect, but still, super cute! I think I shall teach them in my origami class for kids next month at my library.

All you need is a square of paper (origami paper works best, though...you can purchase a pack at a craft store for $6-10). Some markers or colored pencils could be useful too if you want to decorate the frosting more.


Okay! Pick out a cheery pattern for your wrapper: 

Now, flip it over so your icing side is showing, and fold your bottom corner up a little bit, like shown: 

Next, fold the two side-wings of your paper, so that their ends are perpendicular to the base of the paper. [It's alright if they aren't perfectly even--mine isn't!]

Fold up the base of your cupcake so that a straight line is made for your cupcake wrapper. 

Next step is kinda tricky if you haven't done origami before. Flip your cupcake to the other side and fold the sides of your cupcake from the front to the back at a slight angle, like so: 


With your cupcake still face-down, make slight folds to the corners of the cupcake frosting. This will make your cupcake frosting round, not pointy! 


Yay! Almost done! Flip your cupcake to the front. Fold a small triangle from the back to the front, like so. Alternately, if you don't want a cherry/chocolate chip top, you can fold backward, so the top of your cupcake is flat. 

Flip your cupcake around again, so the front is facing down, and make small folds at the top to round off the top of your cupcake. 

Flip it around one more time, and your cupcake, if done correctly, should look something like this: 

Last step: decorate your cupcake! I added sprinkles to this one. 

I might just have to go make real cupcakes now! 

If you have any suggestions or questions about this origami cupcake recipe, please comment below. 


Saturday, February 23, 2013

Cheerful Alphabet Block Magnets!

Do you ever get in lulls where you cannot think of anything to do that is of remote interest? I find myself in that situation quite often. Especially in the middle of winter! Anyway, I was especially bored one evening a few weeks ago. So was my boyfriend. We were bored of playing video games, definitely weary about the prospect of cleaning, and not interested in venturing out in the cold. On reflecting on our lack of interesting projects, we found ourselves in the kitchen looking at our very unexciting refrigerator with absolutely nothing on it. In an ah-ha moment, we set out to decorate it.

Our idea: homemade refrigerator magnets! But with what? 

Digging around my cluttered craft bin, we found a bag of wooden blocks. What could be more cheerful than making our own alphabet blocks? 

We used acrylic paint and fine-tip markers on the wooden blocks which worked just lovely. We bought a pack of 48 small round magnets at our local craft store for $5 and hot glue-gunned the magnets to each block. 


Yay! Our refrigerator looks infinitely better now! 

I imagine there is so more you could do with this! :)