Sunday, February 1, 2015

New/old art in our petite apartment

Our newest addition (above) Only problem is we are officially out of wall space!  Below: art arrangements about the space. We are fortunate to have tall ceilings!


What's lovely about these pieces is that all of them were free, handmade, or from an antiques or thrift store. Have you an amazing vintage find that adorns your walls? 


Friday, January 30, 2015

snowy day poetry writing

trapped in the apartment

the hidden little things
that you thought I'd never know
carefully stored and stocked
in those secretive little spots
up so high
in the corner 
next to the stove
under the carpet
between the cereal and the rice
a piece there, a secret here

oh yes I'd not have known
had you not let it out
while squeaking with your friend
the other mouse


Friday, May 30, 2014

Origami Ball Recipe!

Yay! Isn't it wonderful that it is finally spring? :) It's this time of year that I do so love to make cheery decorations around the house. I made this strand of origami balls sometime ago, but I thought I'd share the recipe today. As far as origami goes, the origami ball is fairly easy and a good deal of fun to make (though, it does take some practice!). I've used them for Christmas ornaments, too, which can be accomplished with a bent paper clip inserted in to the hole (as shown in the end of this post).

First things first, turn your origami piece color side down.

Fold over diagonally and in half, both ways.

...so that you have your square folded into eighths, and open it up, like so.

This part is rather tricky. You will need to flip it over and using both hands, tuck in the corners of the paper, so that it makes a triangle when pushed together.


The inside should look like this.

Now, place your triangle flat and fold up one side...

...like so. It should look like two triangles on one side. You'll need to do the same on the other side of the triangle as well.

Just like this! Now, both flaps on this side have been folded up to make a square at the top of the triangle.

Flip your triangle over and do the exact same thing on the other side.

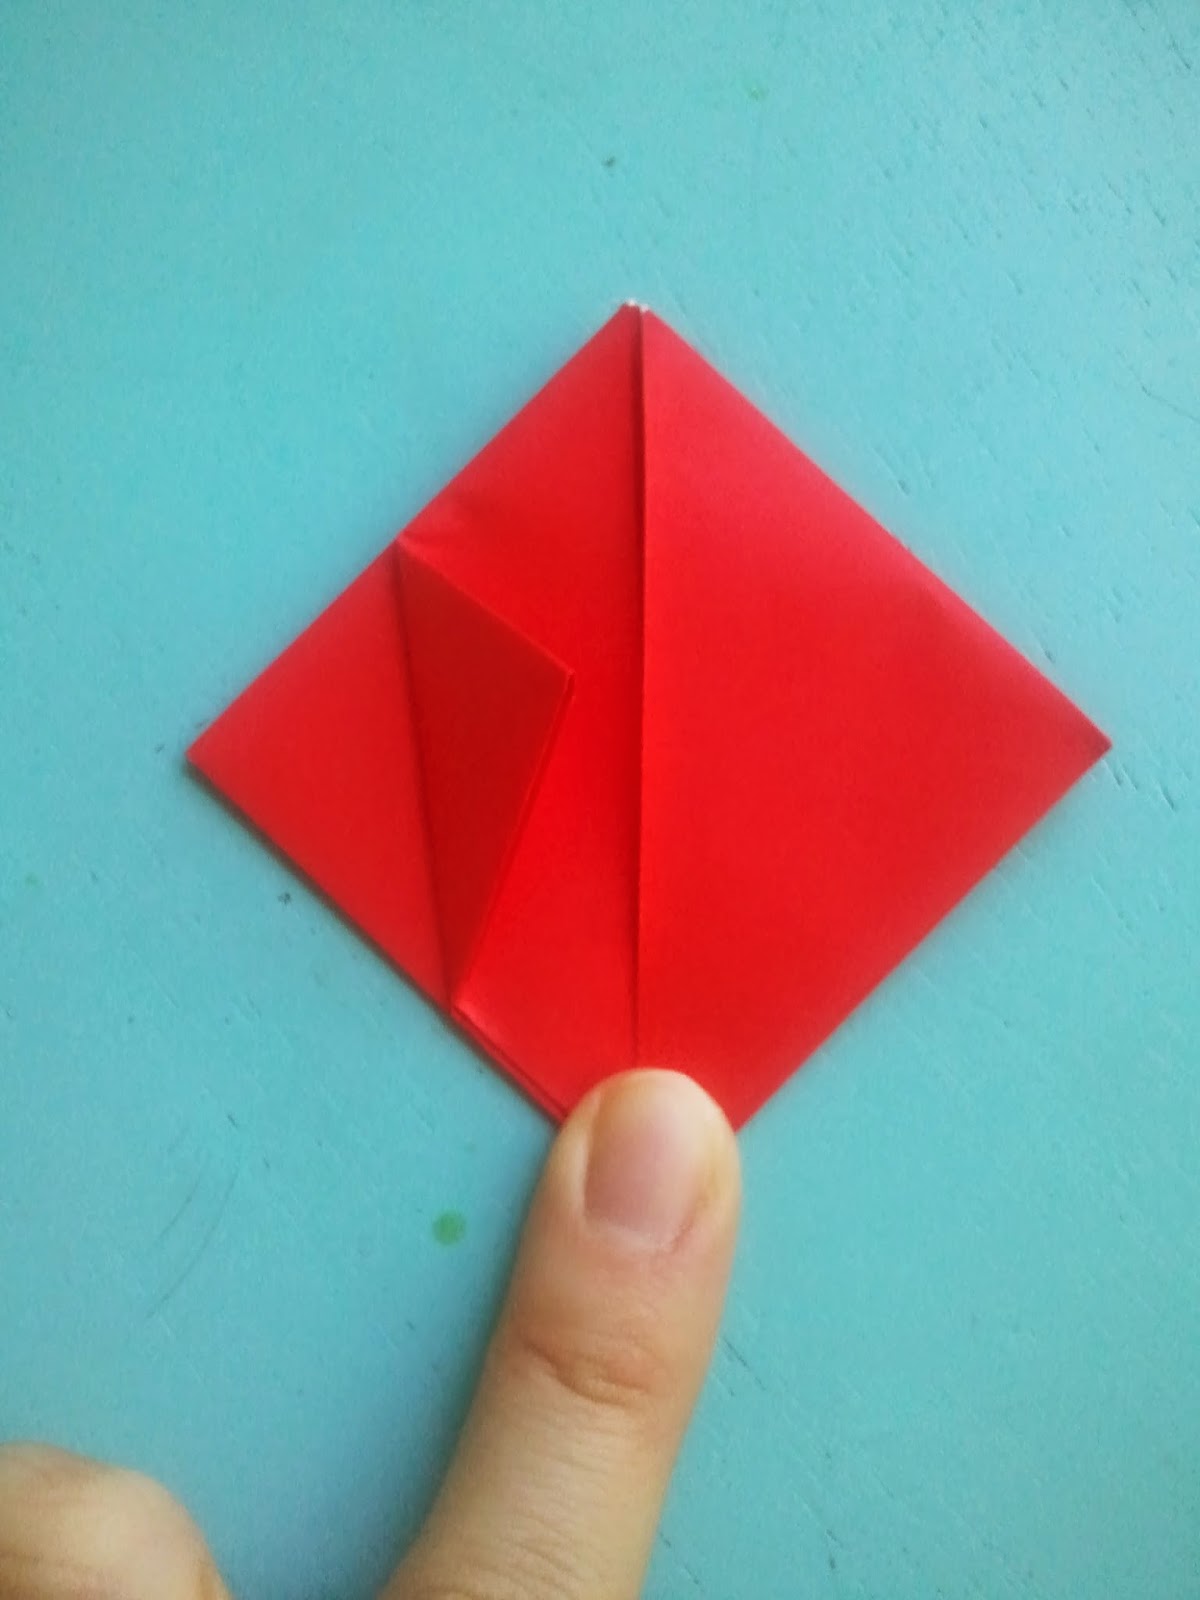
The inside of the paper should like this, and you should have this open side facing you, like so.

Time to make some pockets! Take a corner and fold into the center line.

Do this on all four sides of the origami ball, so it looks like this.

This part might be the trickiest. At the bottom of your paper, there will be four flaps of paper. You will need to tuck these into the "pockets" you made on the previous step.


Make sure you get each flap tucked in!

On this side, both have been tucked in. Turn the piece over and repeat on the other side.


Hold your origami ball upright. Do you see a tiny hole in the top of the ball? Hold the ball between two fingers (you might need to use both hands) and blow into the hole. This is also rather tricky at first. You have to blow pretty hard.

Tada!!!! It's a ball! Well, a rather square ball, but a ball all the same!

If you want to make ornaments, use a paper clip.


You can do quite a bit with origami balls. I've placed a bunch of them in a bowl on a table, hung them up with string, and even placed them in cards for kids once with instructions on how to make them pop! 

Happy weekend! ^_^ Let me know if you have any questions about how to make these. There are a lot of other tutorials online about how to make these, too.

Thursday, May 8, 2014

Thrifty finds and greetings

Why, hello!

I had to get rid of my blog for a brief while and change its name, due to some seedy individuals apparently visiting my site in abundance. Hopefully, that was the end of it!

Anyway, I hope to be rejuvenating this blog over the summer with cheery things. Stay tuned for antiques, books, old houses, stone walls, baked goods, and more. Funs!

A bit on thrifting...I must say, for all of you who are in search of great finds, Goodwill is a great place to start. Generally, things are less than $6 and you never know quite what you might discover--I've encountered designer jeans, vintage furs, and classy shoes (and snatched them up properly!).

The best time to go (and I know this from experience and having a former employee in the family) is EARLY Saturday morning. The store is fully stocked for a busy weekend and it's usually a great time to discover treasures.

Here's some lovely Goodwill thrift finds from last weekend.


Adorable vintage leather slip-ons with a bit of a heel and tassels on the front. Cost: $6.99. Cons: Slightly too small, but I am used to trying to make it work! :P

 James found this teapot lamp in the housewares section. I am not sure if it is homemade or not, actually. We are super excited about it, because we were in dire need of something cheery to go on top of our speakers and to be a companion for our antique teapot...and our wooden turtle... Huzzah! Cost: $4.99. Cons: We had to buy a lampshade.

Awww, we didn't buy this at Goodwill, but such a cute picture of our kitty sitting next to me! :) 

More to come!! Have a lovely spring afternoon.

Saturday, November 9, 2013

wedding diy

Gah, just when I thought I'd be starting to blog consistently, I got super busy. Boo. Thought I'd share some wedding DIY crafts from my wedding in October. It was one of the most lovely days I've had. But goodness, it was a great deal of work. Rather thankful it is over. :)

Starting with the invitation:

Table numbers: James and I bought old alphabet cubes from an antiques store, and then nailed two nails into each one. James did lovely job of painting numbers onto unfinished wooden squares. Cheery.

Pennants: my lovely friend Megan helped oh so immensely with making paper and cloth pennants for the tent. We bought scrapbook paper and then sewed them together with a sewing machine. So cute!

Cloth-ribbon pennant for zee wedding arch.

Cups for seating: We decided to give each of our guests a mug, which had their name and their table number on them. It was a super huge success! It really was not expensive either; we spent some months looking mugs at Goodwill, however.


Homemade chalkboards for signs: We bought several old frames at a flea market for a dollar and purchased some chalkboard paint for around fifteen dollars. James did a lovely job of painting them!

For the aisles, mother and I hung mason jars with hydrangeas from metal hooks. It was simple, but quite pretty.


Last shot: wedding day!


 more later! I must go bake brownies.

Saturday, August 24, 2013

BTV flashback: Church St. 1915


 For all the Burlington, VT fans: a newspaper overview of Church St. businesses, circa 1915. I wish some of these businesses were still around, but to my knowledge, not a single one exists any longer.


http://chroniclingamerica.loc.gov/lccn/sn86072143/1915-12-09/ed-1/seq-13/

Sunday, July 7, 2013

A return to the blogosphere, with old newspaper summer fashion in tow.

Goodness! It's been a terribly long time since my last blog post. Tsk, tsk. I have been quite busy, with both starting a new position, and, planning a wedding for October, if those are worthy excuses. I am determined to start posting more, however, particularly with cute wedding ideas and projects.

However, since I've recently starting working with old newspaper microfilms, it is only fitting I post some fashionable summer vintage styles from the early 1900's. I love, love that vintage is in!
If you want to see each image below more closely, click on the newspaper title. 


Bathing suits from 1916.  Quite different from today, women's swim attire consisted of often a hat, umbrella, skirt or dress, stockings, bloomers, flats, and a top with long or short sleeves. Swimming must have been such an ordeal! From the Burlington Free Press.

1914 Bathing "Costume." You can see the ruffled bloomers underneath the dress.
 From the Day Book


Just in time to block the sun, in a fashionable way, of course! Millinery (hat) styles from 1914. Love the "Helmet What?" and "Aeroplane." From the Day Book.


Straight out of Paris: Summer Evening Gowns from 1909. From the Los Angeles Herald.

Stripes are stylish now as they were 98 years ago. From the Day Book.


Such an adorable dress from 1915. I love her headband and fan; so sweet and summery! From the Day Book.


Lastly, some gorgeous wedding dress styles from 1922. The drop waist and draping on these outfits, combined with the headbands and long veils are just perfect. From the New York Tribune.

Happy summer! I'll post more later.