
Saturday, March 14, 2015

Sunday, February 22, 2015
Sewing adventures: kitty pillow!
I was quite excited to set up my sewing machine after a few years of it sitting in a closet. As much as I love sewing by hand, golly, I am completely enamored by the speed and accuracy of a sewing machine. Am hooked!
One of the things I aspire for most in life is making cute things. Thus, I was quite pleased with this test sewing project.
If you're interested in what I used to make the cute faces of this two-faced pillow: some felt and a hot glue gun. Also this project took less than an hour. :)
Happy Sunday!!!! xxxx
Monday, February 16, 2015
Salad Fingers
Did you ever watch that online cartoon? It was terribly creepy slash hilarious, and it suits a dreary winter evening that just seems to linger on. One realizes quite quickly that it could be worse. :P
Sunday, February 8, 2015
in honor of the tiny house movement
Ah, what else is there to do on a snowy, oh-so-cold morning, besides making tiny adorable origami houses? Also, I recommend eating this while making the petite community.
This is a fairly easy origami task, requiring two sheets of square paper--one to make the roof, another to make the bottom. I found this recipe on my most favorite origami website. Try it yourself: Tiny House Recipe on Origami Club.


This is a fairly easy origami task, requiring two sheets of square paper--one to make the roof, another to make the bottom. I found this recipe on my most favorite origami website. Try it yourself: Tiny House Recipe on Origami Club.
A snowy village!
The village relocates to the kitty's lair.
The kitty examines the new village...
And decides it is unacceptable.
:( :( :(
Shall test out other recipes for architecture in the near future.
Happy Sunday, wherever you are! ^_^
Sunday, February 1, 2015
New/old art in our petite apartment

Our newest addition (above) Only problem is we are officially out of wall space! Below: art arrangements about the space. We are fortunate to have tall ceilings!


What's lovely about these pieces is that all of them were free, handmade, or from an antiques or thrift store. Have you an amazing vintage find that adorns your walls?
Friday, January 30, 2015
snowy day poetry writing
trapped in the apartment
the hidden little things
that you thought I'd never know
carefully stored and stocked
in those secretive little spots
up so high
in the corner
next to the stove
under the carpet
between the cereal and the rice
a piece there, a secret here
oh yes I'd not have known
had you not let it out
while squeaking with your friend
the other mouse

Friday, May 30, 2014
Origami Ball Recipe!

Yay! Isn't it wonderful that it is finally spring? :) It's this time of year that I do so love to make cheery decorations around the house. I made this strand of origami balls sometime ago, but I thought I'd share the recipe today. As far as origami goes, the origami ball is fairly easy and a good deal of fun to make (though, it does take some practice!). I've used them for Christmas ornaments, too, which can be accomplished with a bent paper clip inserted in to the hole (as shown in the end of this post).

 |
| First things first, turn your origami piece color side down. |
 |
| Fold over diagonally and in half, both ways. |
 |
| ...so that you have your square folded into eighths, and open it up, like so. |
 |
| This part is rather tricky. You will need to flip it over and using both hands, tuck in the corners of the paper, so that it makes a triangle when pushed together. |

 |
| The inside should look like this. |
 |
| Now, place your triangle flat and fold up one side... |
 |
| ...like so. It should look like two triangles on one side. You'll need to do the same on the other side of the triangle as well. |
 |
| Just like this! Now, both flaps on this side have been folded up to make a square at the top of the triangle. |
 |
| Flip your triangle over and do the exact same thing on the other side. |
 |
| The inside of the paper should like this, and you should have this open side facing you, like so. |
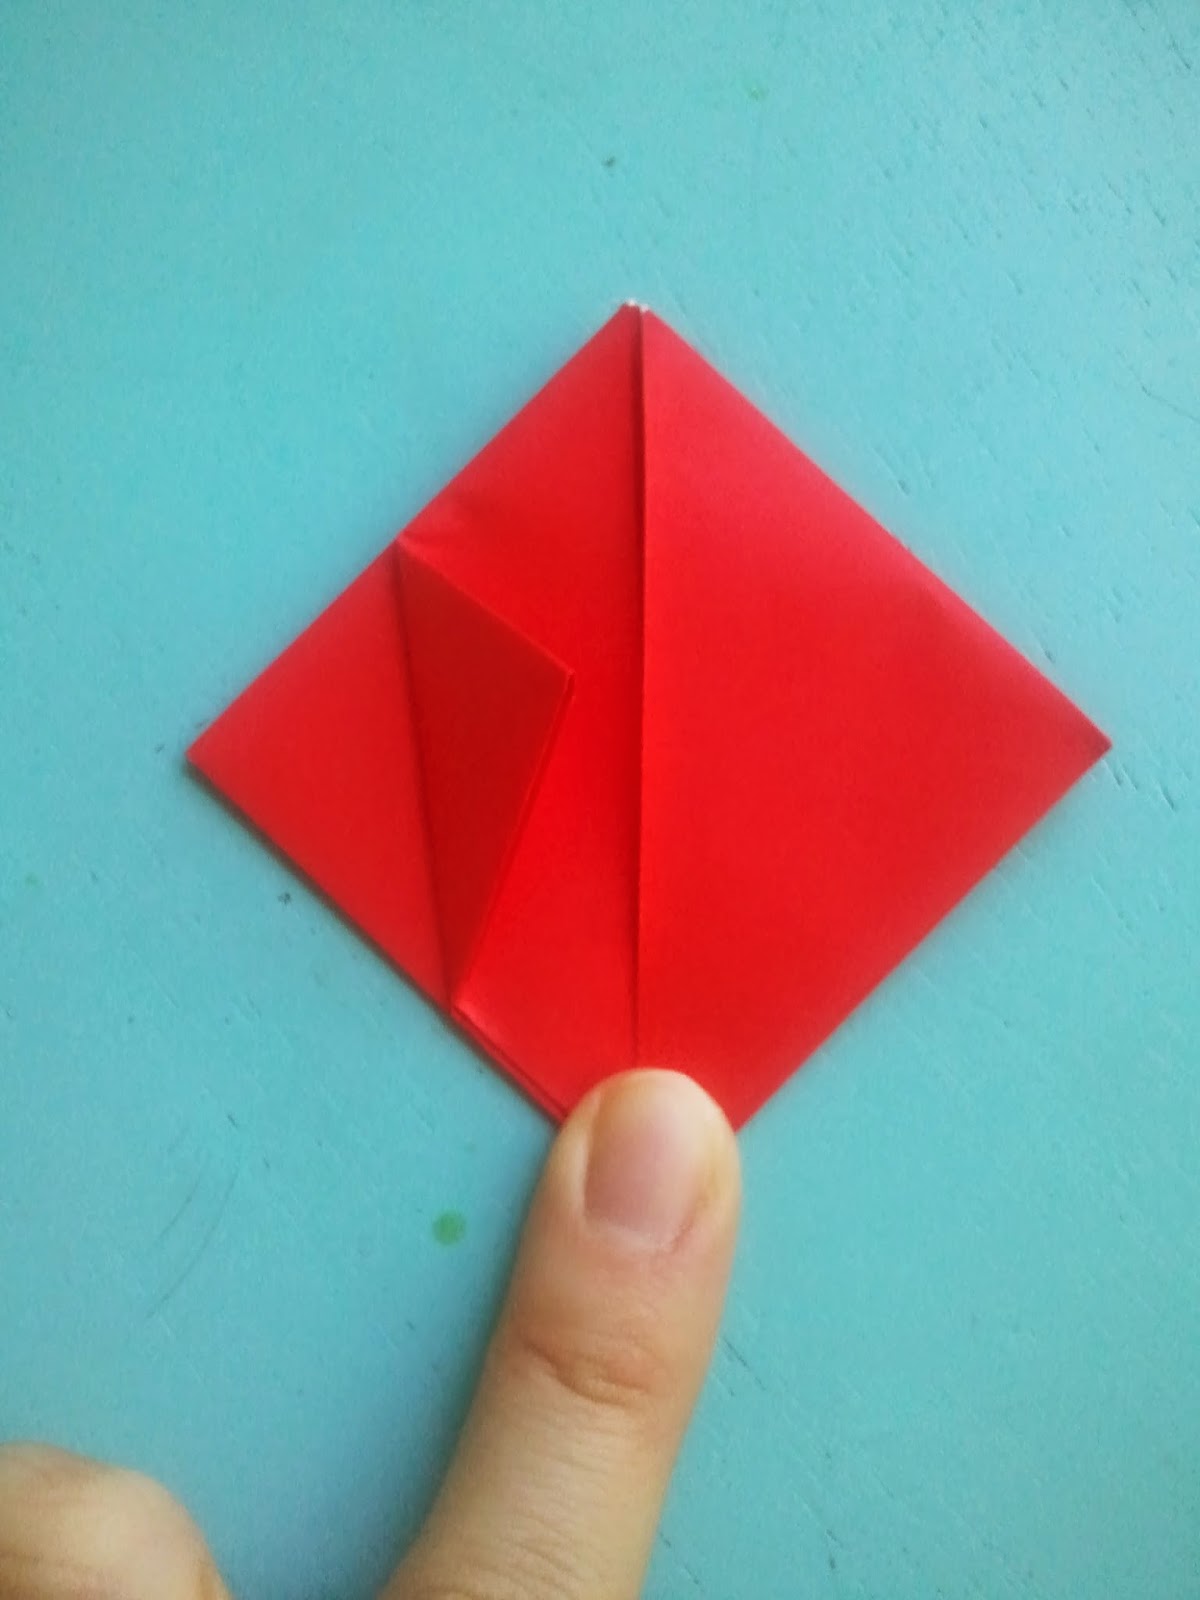 |
| Time to make some pockets! Take a corner and fold into the center line. |
 |
| Do this on all four sides of the origami ball, so it looks like this. |
 |
| This part might be the trickiest. At the bottom of your paper, there will be four flaps of paper. You will need to tuck these into the "pockets" you made on the previous step. |

 |
| Make sure you get each flap tucked in! |
 |
| On this side, both have been tucked in. Turn the piece over and repeat on the other side. |

 |
| Hold your origami ball upright. Do you see a tiny hole in the top of the ball? Hold the ball between two fingers (you might need to use both hands) and blow into the hole. This is also rather tricky at first. You have to blow pretty hard. |
 |
| Tada!!!! It's a ball! Well, a rather square ball, but a ball all the same! |
 |
| If you want to make ornaments, use a paper clip. |

You can do quite a bit with origami balls. I've placed a bunch of them in a bowl on a table, hung them up with string, and even placed them in cards for kids once with instructions on how to make them pop!
Happy weekend! ^_^ Let me know if you have any questions about how to make these. There are a lot of other tutorials online about how to make these, too.
Subscribe to:
Posts (Atom)